Showing posts with label Identity. Show all posts

Thursday, 21 June 2018

Azure Active Directory (AD) Inviting Members and Guests (B2B)

Recently Azure has switched off the old portal and along with it the old Azure AD client. In the old portal there was a way to invite guests and members. In the new portal you can currently only invite guests, if you would like to invite members you need to do this through PowerShell. In this blog post we are going to take a look at how B2B actually works and how you can invite members.

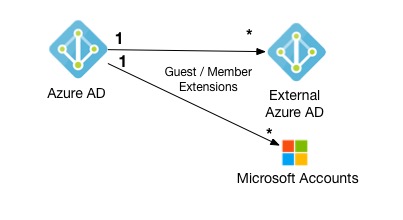
What is a difference between a member and a guest user type? User type is used to enforce different security polices, Microsoft has written some great documentation about this. I found this image extremely helpful in their documentation:

How B2B invite works

How B2B invite works

Let's unpack what is happening in the image above. You can invite users from external Azure ADs and Microsoft Accounts. You can't invite users from Google Identity, etc. The whole B2B collaboration feature works in Microsoft ecosystem only. This means if your company decides to invite 3rd party company users that does not have Azure AD then these users will end up creating Microsoft Accounts to login in to your service.

How to invite members from external Azure AD

Let's say that Elliot Alderson works for ECorp, his original account is residing in ecrophq.onmicrosoft.com Azure AD. Elliot Alderson works for Ecorp Fraud department. ECorp fraud department has decided to get their own Azure AD as they want to enforce their own security rules on their subset of users. Also, they do not want to call ECorp HQ IT department every time they want to setup a brand-new application for authentication (client id, audience, etc).

In this case ECorp Fraud admin will need to run the following script. To keep things simple when this admin calls Connect-AzureAD he will just use adprincipal@ecorpfraud.onmicrosoft.com account to authenticate and invite Elliot.

   
Connect-AzureAD

New-AzureADMSInvitation -InvitedUserEmailAddress "elliot.alderson@ecorphq.onmicrosoft.com" -InviteRedirectUrl https://www.ecorp.com  -SendInvitationMessage $true -InvitedUserType Member

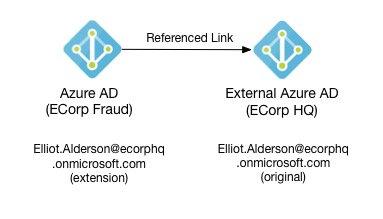
Once Elliot receives the email and accepts invitation this is how this setup will look like:

How Azure AD references users from external Azure AD

I do not know about the Azure AD internals, so I am going to speculate now. It seems that when you add a user from external Azure AD in to your Azure AD it creates this user record as an extension. When Elliot gets the invite or is given the consent URL and approves permissions, referenced link gets created so Azure AD knows where to redirect user to authenticate.

Sunday, 20 May 2018

ASP.NET MVC Multitenancy, Part 4 - Authorisation and Claims

Once users have authenticated in to your application you will need to enable authorisation. If you are building an application that is using federated identity pattern chances are that you are going to be working with claims. ASP.NET comes with Role Based Access Control (RBAC). In this blog post we are going to explore how you can use this with OpenID Connect to enable authorisation.

Identity Provider Token

With OpenID Connect upon authentication users get redirected back to the application with JSON Web Token, this token contains claims about the authenticated user.

JSON Web Token (JWT)

JSON web token looks like this:

   
eyJ0eXAiOiJKV1QiLCJhbGciOiJSUzI1NiIsIng1dCI6ImlCakwxUmNxemhpeTRmcHhJeGRacW9oTTJZayIsImtpZCI6ImlCakwxUmNxemhpeTRmcHhJeGRacW9oTTJZayJ9.eyJhdWQiOiJkYTdhNzQ1Yi05NzUyLTRjNGMtYjI0Zi05YWEyZmVjNGM3N2QiLCJpc3MiOiJodHRwczovL3N0cy53aW5kb3dzLm5ldC83NWIwMmUwZC05MGQxLTQzZTUtYjVkYi0yMGVhYWRkYmZhYzYvIiwiaWF0IjoxNTI2ODE5MTM5LCJuYmYiOjE1MjY4MTkxMzksImV4cCI6MTUyNjgyMzAzOSwiYWlvIjoiQVNRQTIvOEhBQUFBREpYd0VWRnJ2WndBcS9WMlBHcjYzeVQybVk5UVYyS0F1MHZqeExGVXp5ST0iLCJhbXIiOlsiSHdkIl0sImZhbWlseV9uYW1lIjoiS2F2dGFza2luIiwiZ2l2ZW5fbmFtZSI6IlphbiIsImlwYWekciI6IjE4NS42OS4xNDQuMTA0IiwibmFtZSI6IlphbiBLYXZ0YXNraW4iLCJub25jZSI6Il9I609zaENvIiwib2lkIjoiODY4OGZlNWYtYjAxZS00MmVkLTk3MWYtN2E0NDkxZWZjMGY1Iiwib25wcmVtX6NpZCI6IlMtMS01LTIxLTE4NzEzNjg5OTctMjU3NzcyMDU0NS02ODMwNjc4MzMtMTA2OTIiLCJzdWIiOiJ4d3JydG5DY2xfS2lrbngxYlJTTzRPem9aTVEwV0V4bmozRmtqXzY2TEVRIiwidGlkIjoiNzViMDJlMGQtOTBkMS00M2U1LWI1ZGItMjBlYWFkZGJmYWM2IiwidW5pcXVlX25hbWU2OiJaYW4uS2F2dGFza2luQG1oci5jby51ayIsInVwbiI6Ilphbi5LYXZ0YXNraW5AbWhyLmNvLnfrIiwidXRpIjoiRnVqeFZFMFAya3lyUEhDTkFJRVdBQSIsInZlciI6IjEuMCJ9.PYi8_x_NJjhPYflU156dy-5XkmTJc_RAu_Gq0C06QHWuoDbBcMAh1TdkulZ7tVq7lF24EY19W965riA0pruz74GWo_9Ny8Jk1MkJi3oBaZQSMrTz_7rc2Km30UJrKKulmM9em5BfT43fMndCDS4fSVMrp8w0ijNgdCzSvTrK9xid0BsJw8hWiMxDdPPYTI_cEzfx0d587knjoamxaizrNsYwkuHuVJvZwITN94j_hV0KW1LBAW-GRtbbNpB7NDi_-GD6dZH3YW6IsipPRBXNxTNMKZ6zjtdQwDCZ8lui1-Gf77tC0cMUGHX_eIgzIAdEIHr5RfZgik2HT1tBJzzq8g

I recommend that you read more about JWT tokens here. When this token is base 64 decoded it will look like this (above token is not valid, so it will not decode):

   
{
  "aud": "fa74745b-8g52-cc4c-bv4f-0aa2fec4casd",
  "iss": "https://sts.windows.net/fa74745b-8g52-cc4c-bv4f-0aa2fec4casd/",
  "iat": 1526819139,
  "nbf": 1526819139,
  "exp": 1526823039,
  "aio": "ADQA3/8HAAZADJXwEVFrvZwAq/V4Pgr63sT2mY9Q42KAu0fjxLFUzyI=",
  "amr": [
    "pwd"
  ],
  "family_name": "Kavtaskin",
  "given_name": "Zan",
  "ipaddr": "182.67.124.103",
  "name": "Zan Kavtaskin",
  "nonce": "_091823kl",
  "sub": "xwrrtnCcl_Kiknx1bRSO4OzoZMQ0WExnj3Fkj_66LEQ",
  "unique_name": "Zan.Kavtaskin@someemail.com,
  "ver": "1.0"
}

Token is essentially a key value property bag, these properties are called claims, these claims are about the authenticated user.

Claims

Claims are simply properties that are trusted (read more about claims here). Now your web app will mainly use these claims for authentication i.e. who is the user, their unique id, etc. It is unlikely that claims will contain user role information (it can happen, however I have not seen this in practice). This is because 3rd party authentication provider normally does not know anything about your application. You can argue that role data is application data and does not belong with the authentication provider. However, ASP.NET needs role claims to perform authorisation checks, what do you do? Well, you append roles to your claims in your application.

ASP.NET MVC Implementation


Appending roles to the claims

   
public class AuthenticationClaimsAppenderMiddleware : OwinMiddleware
{
    public AuthenticationClaimsAppenderMiddleware(OwinMiddleware next)
        : base(next)
    {

    }

    public override Task Invoke(IOwinContext context)
    {
        IUserService userService = ServiceLocator.Resolve<IUserService>();
        ClaimsPrincipal claimsPrincipal = context.Authentication.User;

        string idpID = claimsPrincipal.FindFirst(ClaimTypes.NameIdentifier).Value;
        UserDto userDto = userService.GetUserByIdpID(idpID);

        if (userDto == null)
            return this.Next.Invoke(context);

        ClaimsIdentity claimsIdentity = claimsPrincipal.Identity as ClaimsIdentity;

        if (userDto.IsAdmin)
        {
            claimsIdentity.AddClaim(new Claim(ClaimTypes.Role, "Admin"));
        }

        return this.Next.Invoke(context);
    }
}

Checking the role claim

Now all you have to do is check the role claim using the authorisation attribute this can be done at the controller and action level:

   
[Authorize(Roles = "Admin")]
public class TenantSettingsController : Controller
{
    //...
}
   
[Authorize]
public class GroupsController : Controller
{
    //...
    [Authorize(Roles = "Admin")]
    [HttpPost]
    public ActionResult RemoveUser(UserModel model)
    {
        //...
    }
}
To enable unauthenticated access use AllowAnonymous attribute:
   
[AllowAnonymous]
public class TenantController : Controller
{
    //...
}
To ensure that user is authenticated without specific role check, use authorize attribute:
   
[Authorize]
public class UserSetupController : Controller
{
    //...
}

*Note: Code in this article is not production ready and is used for prototyping purposes only. If you have suggestions or feedback please do comment.
Thursday, 30 November 2017

ASP.NET MVC Multitenancy, Part 2 - OpenID Connect

In part 1 we have established tenant context. Most business applications need authentication. I have decided to use OpenID Connect, luckily for me it comes with awesome middleware and it's very easy to configure. Here is how you would do it:
public class Startup
{
    public void Configuration(IAppBuilder app)
    {
        //...
        app.UseOpenIdConnectAuthentication(new OpenIdConnectAuthenticationOptions
        {
            ClientId = "clientid",
            Authority = 'authority",
            RedirectUri = "http://mysite.com/"
        });
    }
}

However, not so fast, for each tenant you will need to configure client id, authority, url, etc. This also needs to be done at runtime as you don't want to ship new code every time new tenant registers to use your software. I have looked around for a solution and it turns out that this is a known problem, just take a look at the The Grand Auth Redesign. After a surprising amount of searching I have stumbled upon this amazing Multi-tenant middleware pipelines in ASP.NET Core blog post by Ben Foster. This solution is so damn good. Please read it. Unfortunately it did not work for me out of the box I had to port it over from ASP.NET Core to ASP.NET.

Hopefully by blogging and linking to Ben's article it will be easier for others to find it.

Example Usage

public class Startup
{
    public void Configuration(IAppBuilder app)
    {
        //..
        app.UsePerTenant((tenantContext, appBranch) =>
        {
            appBranch.SetDefaultSignInAsAuthenticationType(CookieAuthenticationDefaults.AuthenticationType);

            appBranch.UseCookieAuthentication(new CookieAuthenticationOptions
            { 
                CookieName = $"OAuthCookie.{tenantContext.FriendlyName}"
            });

            appBranch.UseOpenIdConnectAuthentication(new OpenIdConnectAuthenticationOptions
            {
                ClientId = tenantContext.AuthClientId,
                Authority = tenantContext.AuthAuthority,
                RedirectUri = $"http://localhost:2295/{tenantContext.FriendlyName}/"
            });
        });
    }
}

ASP.NET Implementation


TenantPipelineMiddleware.cs
   
/// <summary>
/// Workaround for the known OpenID multitenancy issue https://github.com/aspnet/Security/issues/1179
/// based on http://benfoster.io/blog/aspnet-core-multi-tenant-middleware-pipelines and https://weblogs.asp.net/imranbaloch/conditional-middleware-in-aspnet-core designs 
/// </summary>
public class TenantPipelineMiddleware : OwinMiddleware
{
    readonly IAppBuilder rootApp;
    readonly Action<TenantContext, IAppBuilder> newBranchAppConfig;
    readonly ConcurrentDictionary<TenantContext, Lazy<Func<IDictionary<string, object>, Task>>> branches;

    public TenantPipelineMiddleware(OwinMiddleware next, IAppBuilder rootApp, Action<TenantContext, IAppBuilder> newBranchAppConfig)
        : base(next)
    {
        this.rootApp = rootApp;
        this.newBranchAppConfig = newBranchAppConfig;
        this.branches = new ConcurrentDictionary<TenantContext, Lazy<Func<IDictionary<string, object>, Task>>>();
    }

    public override async Task Invoke(IOwinContext context)
    {
        TenantContext tenantContext = context.GetTenantContext();

        if (tenantContext == null || tenantContext.IsEmpty())
        {
            await this.Next.Invoke(context);
            return;
        }

        Lazy<Func<IDictionary<string, object>, Task>> branch = 
            branches.GetOrAdd(tenantContext, new Lazy<Func<IDictionary<string, object>, Task>>(() =>
            {
                IAppBuilder newAppBuilderBranch = rootApp.New();
                newBranchAppConfig(tenantContext, newAppBuilderBranch);
                newAppBuilderBranch.Run((oc) => this.Next.Invoke(oc));
                return newAppBuilderBranch.Build();
            }));

        await branch.Value(context.Environment);
    }
}

OwinContextExtensions.cs
   
public static class OwinContextExtensions
{
    static string tenantContextKey = "tenantcontext";

    public static TenantContext GetTenantContext(this IOwinContext context)
    {
        if (context.Environment.ContainsKey(tenantContextKey))
        {
            return (TenantContext)context.Environment[tenantContextKey];
        }
        return null;
    }
}

AppBuilderExtensions.cs
   
public static class AppBuilderExtensions
{
    public static IAppBuilder UsePerTenant(this IAppBuilder app, Action<TenantContext, IAppBuilder> newBranchAppConfig)
    {
        return app.Use<TenantPipelineMiddleware>(app, newBranchAppConfig);
    }
}

*Note: Code in this article is not production ready and is used for prototyping purposes only. If you have suggestions or feedback please do comment.