Sunday 2 September 2018

Applied Software Delivery : Full Stack Developer vs Partial Stack Developer

Agile team consists of cross-functional team members, some of them work on the backend, frontend, infrastructure, persistence, etc. Typically developers specialise in one of these areas. However what happens if you identify a constraint in your team? What if a developer leaves? This means you have to hire or borrow a developer from another team. What is the alternative?

Full Stack

This developer is a Swiss army knife developer. Full stack developers have large amount of shallow (and maybe in depth) knowledge and can take on large amount of technologies, such as .NET, Angular, MSSQL, MongoDB, Azure Hosting, Selenium, etc. Finding these people is near impossible, why is explored here by Andy Shora.

Partial Stack

Much more realistic alternative would to be to move away from developers with single speciality towards hybrid developers. These developers would not know the entire stack but they would have a primary (core) and secondary skill. How does this compare?

Team with single skill

Name Skill
John Austin Angular
Vince Perk BDD
Sarah Wood .NET Developer
Ed Skim Test Analyst
Martin Lee Angular
Jason Dmit .NET Developer

Single skill model creates fragile teams. If single skill is not available then developers need to be borrowed from other teams or new additional people need to be hired, chances are that inventory will start to pile up. This slows down overall delivery.

Team with hybrid skills

Name Primary Skill (Core) Secondary Skill
John Austin Angular .NET Developer
Vince Perk BDD .NET Developer
Sarah Wood .NET Developer Angular
Ed Skim Test Analyst BDD
Martin Lee Angular Test Analyst
Jason Dmit .NET Developer BDD

Teams with hybrid developers are less fragile, they can elevate constraints, resolve issues within a team, don’t have to wait for anyone, which means they are more empowered and productive.

To create teams with hybrid developers your company will need to cross-skill existing staff and start hiring people with relevant skills. All of this will take time and patience. However, I do believe that this will not just benefit the organisations, but also the developers.

Saturday 25 August 2018

Applied Software Delivery : Hidden Impact Of Team Leaders

Upon reading software management books, one of the things that I don’t recall reading much about is the impact of team leaders on the overall team's performance. Most software management books talk about lean production, theory of constraints, etc. These concepts are important, however these books do skip the very important factor in software engineering, people. Good team leaders can make a software team fly or crawl.

No matter what you call your team leaders, managers, scrum masters, supervisors, etc. These people have huge impact. Good team leaders resolve issues, bring people together and ironically enable the team to be more self organising. Team leaders are the ceiling of your teams performance.

When it comes to software development things are not easy, especially at scale. Your typical software team will be facing issues with the following:

  • Infrastructure 
    • Build servers 
    • Release pipelines 
    • Laptops 
    • Environments 
    • Access 
  • Timely, clear and prioritised: 
    • Functional Requirements 
    • Non functional requirements 
    • Business priorities 
  • Bugs 
  • Customer requests / feedback 
  • Ambiguous or bad decisions 
  • People 
    • Absence 
    • Behaviour 
    • Conflict 
    • Lack of staff 
  • … the list goes on

At scale there are hundreds of things that can go wrong during a sprint. Good team leaders work with their teams to implement permanent solutions to these problems. They assign work to the right people in the team, they provide right level of support and coach for optimal performance. This is not easy stuff, especially when you have to do it everyday. It is unlikely that team leaders in your organisation will be able to do this out of the box, which means you will need to listen, train, mentor, coach, and generally invest in them.

Managers of all levels often overlook this and focus on the wrong things. Personally, I have fixated more on the lean production concepts such as single piece flow, theory of constraints then team leaders. Why? Well, process is easier to implement and change. People are hard. They are not code, they are not servers, they can’t be changed with few lines of code and they can’t be reconfigured within few seconds. It takes time and patience. In software engineering this is the hardest and the most important thing you can do, invest in your people, especially in your team leaders, before you fixate on agile concepts and technology.

Thursday 21 June 2018

Azure Active Directory (AD) Inviting Members and Guests (B2B)

Recently Azure has switched off the old portal and along with it the old Azure AD client. In the old portal there was a way to invite guests and members. In the new portal you can currently only invite guests, if you would like to invite members you need to do this through PowerShell. In this blog post we are going to take a look at how B2B actually works and how you can invite members.

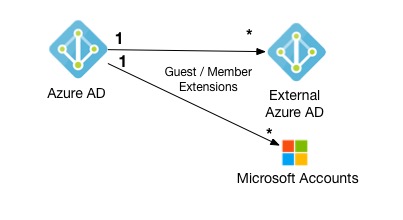
What is a difference between a member and a guest user type? User type is used to enforce different security polices, Microsoft has written some great documentation about this. I found this image extremely helpful in their documentation:

How B2B invite works

How B2B invite works

Let's unpack what is happening in the image above. You can invite users from external Azure ADs and Microsoft Accounts. You can't invite users from Google Identity, etc. The whole B2B collaboration feature works in Microsoft ecosystem only. This means if your company decides to invite 3rd party company users that does not have Azure AD then these users will end up creating Microsoft Accounts to login in to your service.

How to invite members from external Azure AD

Let's say that Elliot Alderson works for ECorp, his original account is residing in ecrophq.onmicrosoft.com Azure AD. Elliot Alderson works for Ecorp Fraud department. ECorp fraud department has decided to get their own Azure AD as they want to enforce their own security rules on their subset of users. Also, they do not want to call ECorp HQ IT department every time they want to setup a brand-new application for authentication (client id, audience, etc).

In this case ECorp Fraud admin will need to run the following script. To keep things simple when this admin calls Connect-AzureAD he will just use adprincipal@ecorpfraud.onmicrosoft.com account to authenticate and invite Elliot.

   
Connect-AzureAD

New-AzureADMSInvitation -InvitedUserEmailAddress "elliot.alderson@ecorphq.onmicrosoft.com" -InviteRedirectUrl https://www.ecorp.com  -SendInvitationMessage $true -InvitedUserType Member

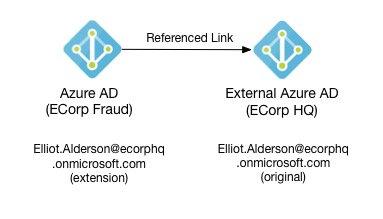
Once Elliot receives the email and accepts invitation this is how this setup will look like:

How Azure AD references users from external Azure AD

I do not know about the Azure AD internals, so I am going to speculate now. It seems that when you add a user from external Azure AD in to your Azure AD it creates this user record as an extension. When Elliot gets the invite or is given the consent URL and approves permissions, referenced link gets created so Azure AD knows where to redirect user to authenticate.

Tuesday 5 June 2018

Azure AD - Relationships between Azure EA Accounts and Subscriptions

When it comes to relationship between Azure Portal, Azure AD and Azure EA Portal it can get very confusing and frustrating. It can be hard to understand what you have to do to enable authentication in to the Azure Portal and why you have so many Azure ADs flying around. This brief blog post will try and explain relationship between Azure EA Portal account, Azure AD that gets created automatically and Azure subscriptions that can be accessed in the Azure Portal.

When you login to the Azure Enterprise Agreement Portal (Azure EA Portal) you can create "accounts" and under accounts you can create "subscriptions". Subscriptions is where you place your services (this is done in Azure Portal). Accounts is where you place your subscriptions (this is done in Azure EA Portal). When you create "account" Azure AD is automatically created for that account, and all subscriptions under that account link to that Azure AD. Here is the diagram that shows this relationship:

Azure AD, Subscription and Account Relationship Diagram

Let's say you have created ECorpFraud account in the Azure EA Portal and it belongs to ECorp Fraud department. That account will automatically get ECorpFraud Azure AD. This AD will be used to authenticate your users in to Azure Portal and let them see relevant Azure Subscriptions.

Imagine that Alice works in ECorp Fraud department, someone will need to add her to the ECorpFraud AD, once she is in there you will be able to give her permissions to see resources in Subscription A or B. Azure Portal itself uses Azure AD to enable authentication.

Now, if I create ECorp Finance account, same thing will happen. Azure AD for ECorp Finance will be created. I will then be able to add relevant users to that AD and then give them access in to the relevant subscriptions, in this case Alice and John.

Saturday 26 May 2018

ASP.NET MVC Multitenancy - Introduction & Architecture Overview

Over the past 5 years I had an opportunity to architect and develop multi tenanted applications. However, when it came to ASP.NET C# implementation I have struggled to find examples that solve common problems. In this blog series I will try to provide these examples:

This series focuses on a simple multitenancy architecture (more accessible to wider audience). Here is a high-level overview:

If you would like to get an architectural overview of multitenancy in general and see how you can deploy your application on to Azure then check out my "Developing multi-tenant SaaS business applications on Azure" WROC# conference talk. This talk is very much architectural extension of this blog post series. I hope you will find it useful:


Sunday 20 May 2018

ASP.NET MVC Multitenancy, Part 4 - Authorisation and Claims

Once users have authenticated in to your application you will need to enable authorisation. If you are building an application that is using federated identity pattern chances are that you are going to be working with claims. ASP.NET comes with Role Based Access Control (RBAC). In this blog post we are going to explore how you can use this with OpenID Connect to enable authorisation.

Identity Provider Token

With OpenID Connect upon authentication users get redirected back to the application with JSON Web Token, this token contains claims about the authenticated user.

JSON Web Token (JWT)

JSON web token looks like this:

   
eyJ0eXAiOiJKV1QiLCJhbGciOiJSUzI1NiIsIng1dCI6ImlCakwxUmNxemhpeTRmcHhJeGRacW9oTTJZayIsImtpZCI6ImlCakwxUmNxemhpeTRmcHhJeGRacW9oTTJZayJ9.eyJhdWQiOiJkYTdhNzQ1Yi05NzUyLTRjNGMtYjI0Zi05YWEyZmVjNGM3N2QiLCJpc3MiOiJodHRwczovL3N0cy53aW5kb3dzLm5ldC83NWIwMmUwZC05MGQxLTQzZTUtYjVkYi0yMGVhYWRkYmZhYzYvIiwiaWF0IjoxNTI2ODE5MTM5LCJuYmYiOjE1MjY4MTkxMzksImV4cCI6MTUyNjgyMzAzOSwiYWlvIjoiQVNRQTIvOEhBQUFBREpYd0VWRnJ2WndBcS9WMlBHcjYzeVQybVk5UVYyS0F1MHZqeExGVXp5ST0iLCJhbXIiOlsiSHdkIl0sImZhbWlseV9uYW1lIjoiS2F2dGFza2luIiwiZ2l2ZW5fbmFtZSI6IlphbiIsImlwYWekciI6IjE4NS42OS4xNDQuMTA0IiwibmFtZSI6IlphbiBLYXZ0YXNraW4iLCJub25jZSI6Il9I609zaENvIiwib2lkIjoiODY4OGZlNWYtYjAxZS00MmVkLTk3MWYtN2E0NDkxZWZjMGY1Iiwib25wcmVtX6NpZCI6IlMtMS01LTIxLTE4NzEzNjg5OTctMjU3NzcyMDU0NS02ODMwNjc4MzMtMTA2OTIiLCJzdWIiOiJ4d3JydG5DY2xfS2lrbngxYlJTTzRPem9aTVEwV0V4bmozRmtqXzY2TEVRIiwidGlkIjoiNzViMDJlMGQtOTBkMS00M2U1LWI1ZGItMjBlYWFkZGJmYWM2IiwidW5pcXVlX25hbWU2OiJaYW4uS2F2dGFza2luQG1oci5jby51ayIsInVwbiI6Ilphbi5LYXZ0YXNraW5AbWhyLmNvLnfrIiwidXRpIjoiRnVqeFZFMFAya3lyUEhDTkFJRVdBQSIsInZlciI6IjEuMCJ9.PYi8_x_NJjhPYflU156dy-5XkmTJc_RAu_Gq0C06QHWuoDbBcMAh1TdkulZ7tVq7lF24EY19W965riA0pruz74GWo_9Ny8Jk1MkJi3oBaZQSMrTz_7rc2Km30UJrKKulmM9em5BfT43fMndCDS4fSVMrp8w0ijNgdCzSvTrK9xid0BsJw8hWiMxDdPPYTI_cEzfx0d587knjoamxaizrNsYwkuHuVJvZwITN94j_hV0KW1LBAW-GRtbbNpB7NDi_-GD6dZH3YW6IsipPRBXNxTNMKZ6zjtdQwDCZ8lui1-Gf77tC0cMUGHX_eIgzIAdEIHr5RfZgik2HT1tBJzzq8g

I recommend that you read more about JWT tokens here. When this token is base 64 decoded it will look like this (above token is not valid, so it will not decode):

   
{
  "aud": "fa74745b-8g52-cc4c-bv4f-0aa2fec4casd",
  "iss": "https://sts.windows.net/fa74745b-8g52-cc4c-bv4f-0aa2fec4casd/",
  "iat": 1526819139,
  "nbf": 1526819139,
  "exp": 1526823039,
  "aio": "ADQA3/8HAAZADJXwEVFrvZwAq/V4Pgr63sT2mY9Q42KAu0fjxLFUzyI=",
  "amr": [
    "pwd"
  ],
  "family_name": "Kavtaskin",
  "given_name": "Zan",
  "ipaddr": "182.67.124.103",
  "name": "Zan Kavtaskin",
  "nonce": "_091823kl",
  "sub": "xwrrtnCcl_Kiknx1bRSO4OzoZMQ0WExnj3Fkj_66LEQ",
  "unique_name": "Zan.Kavtaskin@someemail.com,
  "ver": "1.0"
}

Token is essentially a key value property bag, these properties are called claims, these claims are about the authenticated user.

Claims

Claims are simply properties that are trusted (read more about claims here). Now your web app will mainly use these claims for authentication i.e. who is the user, their unique id, etc. It is unlikely that claims will contain user role information (it can happen, however I have not seen this in practice). This is because 3rd party authentication provider normally does not know anything about your application. You can argue that role data is application data and does not belong with the authentication provider. However, ASP.NET needs role claims to perform authorisation checks, what do you do? Well, you append roles to your claims in your application.

ASP.NET MVC Implementation


Appending roles to the claims

   
public class AuthenticationClaimsAppenderMiddleware : OwinMiddleware
{
    public AuthenticationClaimsAppenderMiddleware(OwinMiddleware next)
        : base(next)
    {

    }

    public override Task Invoke(IOwinContext context)
    {
        IUserService userService = ServiceLocator.Resolve<IUserService>();
        ClaimsPrincipal claimsPrincipal = context.Authentication.User;

        string idpID = claimsPrincipal.FindFirst(ClaimTypes.NameIdentifier).Value;
        UserDto userDto = userService.GetUserByIdpID(idpID);

        if (userDto == null)
            return this.Next.Invoke(context);

        ClaimsIdentity claimsIdentity = claimsPrincipal.Identity as ClaimsIdentity;

        if (userDto.IsAdmin)
        {
            claimsIdentity.AddClaim(new Claim(ClaimTypes.Role, "Admin"));
        }

        return this.Next.Invoke(context);
    }
}

Checking the role claim

Now all you have to do is check the role claim using the authorisation attribute this can be done at the controller and action level:

   
[Authorize(Roles = "Admin")]
public class TenantSettingsController : Controller
{
    //...
}
   
[Authorize]
public class GroupsController : Controller
{
    //...
    [Authorize(Roles = "Admin")]
    [HttpPost]
    public ActionResult RemoveUser(UserModel model)
    {
        //...
    }
}
To enable unauthenticated access use AllowAnonymous attribute:
   
[AllowAnonymous]
public class TenantController : Controller
{
    //...
}
To ensure that user is authenticated without specific role check, use authorize attribute:
   
[Authorize]
public class UserSetupController : Controller
{
    //...
}

*Note: Code in this article is not production ready and is used for prototyping purposes only. If you have suggestions or feedback please do comment.
Saturday 12 May 2018

ASP.NET MVC Multitenancy, Part 0 - Subdomain VS URL Path

With multitenancy you will need to decide how you are going to identify your tenants. There are two user friendly approaches, subdomain fictionaltenant.multitenantedapp.com or URL Path multitenantedapp.com/fictionaltenant/. In this post we are going to explore disadvantages and advantages of these two approaches.

Subdomain


Configuration

It is surprisingly easy to set this up for a simple deployment model. This is what you have to do:

Setup DNS record

I went to my domain registrar site and configured all my traffic on *.multitenantedapp.com to point to my Azure Web App domain e.g. *.multitenantedapp.com -> zkwildcardtest.azurewebsites.net.


Setup wildcard hostname

After that all I had to do was configure my Azure Web App to accept traffic for the hostname *.multitenantedapp.com. If you are using a web server such as IIS you will just need to change the IIS hostname binding.


Deploy your app

Just to make sure everything works as it should, I have deployed a simple test app that reads the URI and extracts subdomain from it. I went to tenanta.multitenantedapp.com and this is what I saw:


Why should you use this approach?


Advance estate management

For me advance estate management is the main reason why you would go for this approach. As your application scales you will want to split up your deployment zones. For example, you might want to deploy 50 tenants to zone A and other 50 tenants to zone b. What if some tenants in zone A are being noise neighbours (using your application a lot)? How will you migrate them to the zone C? With subdomain you can use DNS to redirect traffic, subdomain will remain the same, just the DNS mapping will need to change.

Customisation

You can enable customisation, so for example if you own fictionalcompany.com domain you can point files.fictionalcompany.com to fictionalcompany.multitenantedapp.com. This sounds simple but there is more to it. You need register this hostname on your web server. Also if you would like your connection to be secure you will need to get fictionalcompany to give you the subdomain SSL certificate.

Log quality

Here is how the subdomain IIS log looks like:

date: 2018-01-30 
time: 22:25:30
s-sitename: ZKWILDCARDTEST
cs-method: GET
cs-uri-stem: /
cs-uri-query: -
s-port: 80
cs-username: -
c-ip: 102.152.31.182
cs(User-Agent): -
cs(Cookie): -
cs(Referer): -
cs-host: fictionalcompany.multitenantedapp.com TENANT'S NAME APPEARS HERE
sc-status: 200
sc-substatus: 0
sc-win32-status: 0
sc-bytes: 1958
cs-bytes: 1066
time-taken: 0

cs-host (client-server host) actually shows fully qualified subdomain. This is great, as it is very easy to parse and hard to spoof. This can be used for business and security analytics.

URL Path


Configuration

There is not much to URL path setup. You just need to configure your web application's framework mapping. If you are using ASP.NET MVC it would look something like this:

  
namespace Web
{
    public class RouteConfig
    {
        public static void RegisterRoutes(RouteCollection routes)
        {
            //...

            routes.MapRoute(
                "multi",
                "{tenant}/{controller}/{action}/{id}",
                new {controller = "Dashboard", action = "Index", id = UrlParameter.Optional}
            ).DataTokens.Add("name", "webclient_multitenancy");

        }
    }
}

For full mapping explanation take a look at this article.

With this approach you can introduce proxy layer, that proxy layer can then direct your traffic to different deployment zones. So in a way you can achieve same thing. However you are introducing additional infrastructure, which will require implementation, deployment, hosting and maintenance. If you can avoid it, you should.

Why should you use this approach?

The main benefit is that it is simple to implement and requires no DNS work of any kind. However with this approach you do compromise on advance estate management, customisation and log quality.

Here is how the IIS log would look like with URL path:

   
date: 2018-01-30 
time: 22:25:30
s-sitename: ZKWILDCARDTEST
cs-method: GET
cs-uri-stem: /fictionalcompany/somepage/ TENANT'S NAME APPEARS HERE
cs-uri-query: -
s-port: 80
cs-username: -
c-ip: 102.152.31.182
cs(User-Agent): -
cs(Cookie): -
cs(Referer): -
cs-host: multitenantedapp.com THIS IS NOT SHOWING TENANT'S NAME ANYMORE
sc-status: 200
sc-substatus: 0
sc-win32-status: 0
sc-bytes: 1958
cs-bytes: 1066
time-taken: 0

The main thing to notice is that client server host is now not showing the tenant's name. Now you need to parse cs-uri-stem which is more difficult. Also if your application is a single page application that performs all operations via API, chances are that tenant's name will be in the header which means you will not know which tenant is making the API requests.

Conclusion

If you are starting to work on a large-scale project, I strongly recommend that you give it a bit extra time and invest in the subdomain implementation. It's just so versatile, it will help you scale long term. However if you are working for a small start-up, you don't have the DNS skills in your team and you are not sure where project is going you can just use the URL path to get you off the ground.


*Note: Code in this article is not production ready and is used for prototyping purposes only. If you have suggestions or feedback please do comment.